#013 TF TensorFlow Lite
Highlights: In this post we are going to show how to build a computer vision model and prepare it for deploying on mobile and embedded devices. With this knowledge you can really deploy a script into an everyday use or a mobile app.
Tutorial Overview:
- Introduction
- Building a model in TensorFlow
- Converting a model to TensorFlow Lite
- Post-training quantization
1. Introduction
Last time, we showed how we can improve a model performance using transfer learning. But why would we only use our model to predict images of cats or dogs on our computer when we can use it on our smartphone or other embedded device.
TensorFlow Lite is TensorFlow’s lightweight solution for mobile and embedded devices. It allows us to run machine learning models on mobile devices with low latency, quickly without need for accessing the server.
It can be used both on Android and iOS devices via a C++ API, as well as with Java wrapper for Android developers.
2. Building a model in TensorFlow
Before we start with TensorFlow Lite, we need to train a model. We will train a model from a set of data using higher powered machine like desktop computer or cloud platform. Then, this model can be exported and used on a mobile device.
Let us first prepare the dataset for the training. We are going to download dataset with wget.download command. After that, we need to unzip it and merge paths for the training and test parts.
Next, let’s import all the required libraries and build our model. We will use a pretrained network called MobileNetV2, which is trained on the ImageNet dataset. After, we need to freeze pretrained layers and add a new layer, called GlobalAveragePooling2D and after this a Dense layer with a sigmoid activation function. We will use an image data generator to iterate through images.
3. Converting a model to TensorFlow Lite
After training a deep neural network in TensorFlow, we can convert it to TensorFlow Lite.
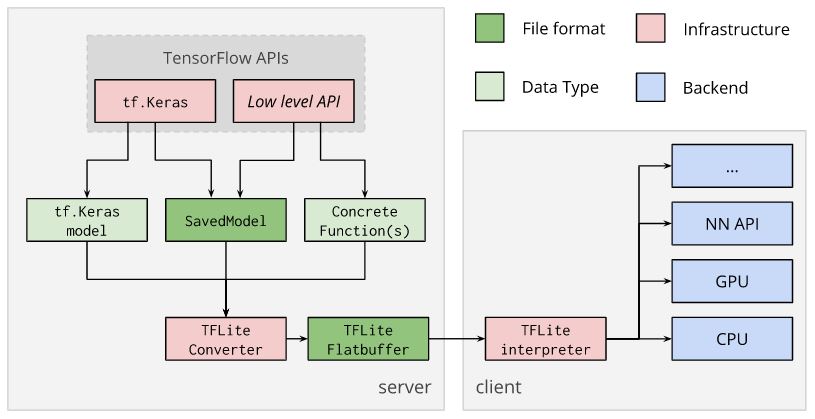
The idea here is to use provided TensorFlow Lite converter to convert a model and to generate a TensorFlow Lite FlatBuffer file. The extension for this type of file is .tflite.
Conversion is possible directly from trained tf.keras models, saved model or concrete TensorFlow functions, which is also possible.
After conversion, FlatBuffer file can be deployed to a client device. On a client device it can be run locally with TensorFlow Lite interpreter.
Let’s see how to run this model directly from Python using TensorFlow Lite Interpreter.
We can get input and output details for our model by running get_input_details and get_output_details functions. We can also resize input and output size, so we can run predictions on a whole batch on images.
Next, we can generate a batch of images, in our case 32 of them, because this was the number used in image data generator earlier.
The first step for making predictions with TensorFlow Lite is to set input to the model, which in our case is a batch of 32 images. After setting the input tensor, we can invoke the interpreter calling the invoke command. Output predictions will be obtained by calling the get_tensor command.
Let’s compare the results of TensorFlow Lite model and TensorFlow model. They should be the same. We will do this by using np.testing.assert_almost_equal function. It will raise and error if results are not the same up to the certain number of decimal places.
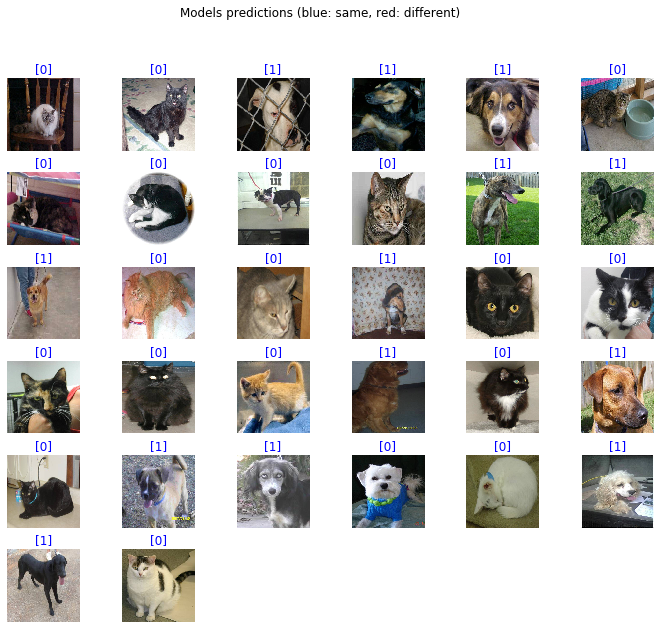
No errors so far, so it shows us that this conversion was successfully done. But this was with class probability. Let’s write a function that will transform this into classes. This function will do the same thing as the built one in TensorFlow. In addition, we will also display these predictions. With red will be displayed different predictions from the main TensorFlow model and with blue images where both models made the same prediction. As a label, we will display predictions from the TensorFlow Lite model.
4. Post-training quantization
This was pretty straightforward, but some models are not optimized for running on low powered devices. So, in order to tackle this problem, we need to do quantization.
Post-training quantization is a conversion technique that can reduce model size while also improving CPU and hardware accelerator latency, with little degradation in model accuracy.
The following table shows three techniques and their benefit, also hardware on which it can be run.
| Technique | Benefits | Hardware |
|---|---|---|
| Weight quantization | 4x smaller, 2-3x speedup, accuracy | CPU |
| Full integer quantization | 4x smaller, 3x + speedup | CPU, Edge TPU, etc. |
| Float16 quantization | 2x smaller, potential GPU acceleration | CPU/GPU |
Let’s see how it works for weight quntization, which is a default one.
The following decision tree can help determine which post-training quantization method the best suits your use case.
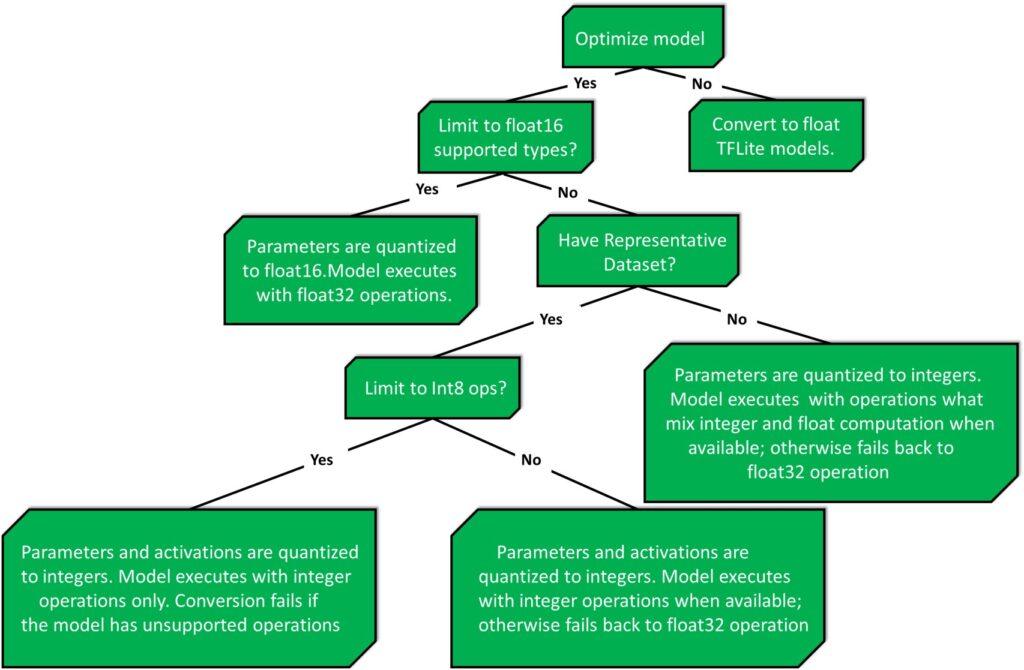
In our case we are using a model called MobileNetV2, which is already optimized for low powered devices. So weight quantization in this example will lower the model accuracy.
Same as before, let’ see how the model performs this time. With red will be displayed different predictions from the main TensorFlow model and with blue images where both models made the same prediction. As a label, we will display predictions from the TensorFlow Lite model.

Summary
To sum it up, in this post we were talking about conversion from TensorFlow to TensorFlow Lite and optimization for low powered devices. In the next post we will show how to implement LeNet-5 in TensorFlow 2.0.