LLM_log #015: Fine-Tuning LLMs — Teach a 3B Model to Call Functions with QLoRA + Unsloth on Free Colab T4

Every modern LLM agent — from ChatGPT plugins to Claude tools — relies on a single learned skill: outputting a structured JSON function call instead of free text. In this post we teach that skill to a 3-billion parameter model using QLoRA on a free Google Colab T4. We start from the fundamentals — why fine-tuning, when LoRA, how quantization works — then build the full training pipeline from scratch. By the end, your model takes a user query like “What’s the weather in Tokyo?” and outputs {"name": "get_weather", "arguments": {"city": "Tokyo"}}. So let’s begin!
Tutorial Overview:
- What Is Fine-Tuning and Why?
- Encoder vs Decoder — Two Paths
- Instruction Fine-Tuning — The Key Idea
- LoRA — Train 1% of Parameters
- Quantization & QLoRA — Making It Fit
- Evaluation & RAG vs Fine-Tuning
- What Is Function Calling?
- The Training Data & The Goal
- Hands-On: The Complete Tutorial
- Results — Before vs After
- Appendix: Full Colab Code
1. What Is Fine-Tuning and Why?
Think of fine-tuning an LLM like taking a general-purpose robotic arm and swapping its end-effector for a highly specialized tool: you don’t rebuild the servomotors or the base logic, you just calibrate the final few degrees of freedom for your specific task. Training a foundation model from scratch requires millions of dollars in compute, but adapting an open-source model to your proprietary data follows a strictly bounded pipeline.
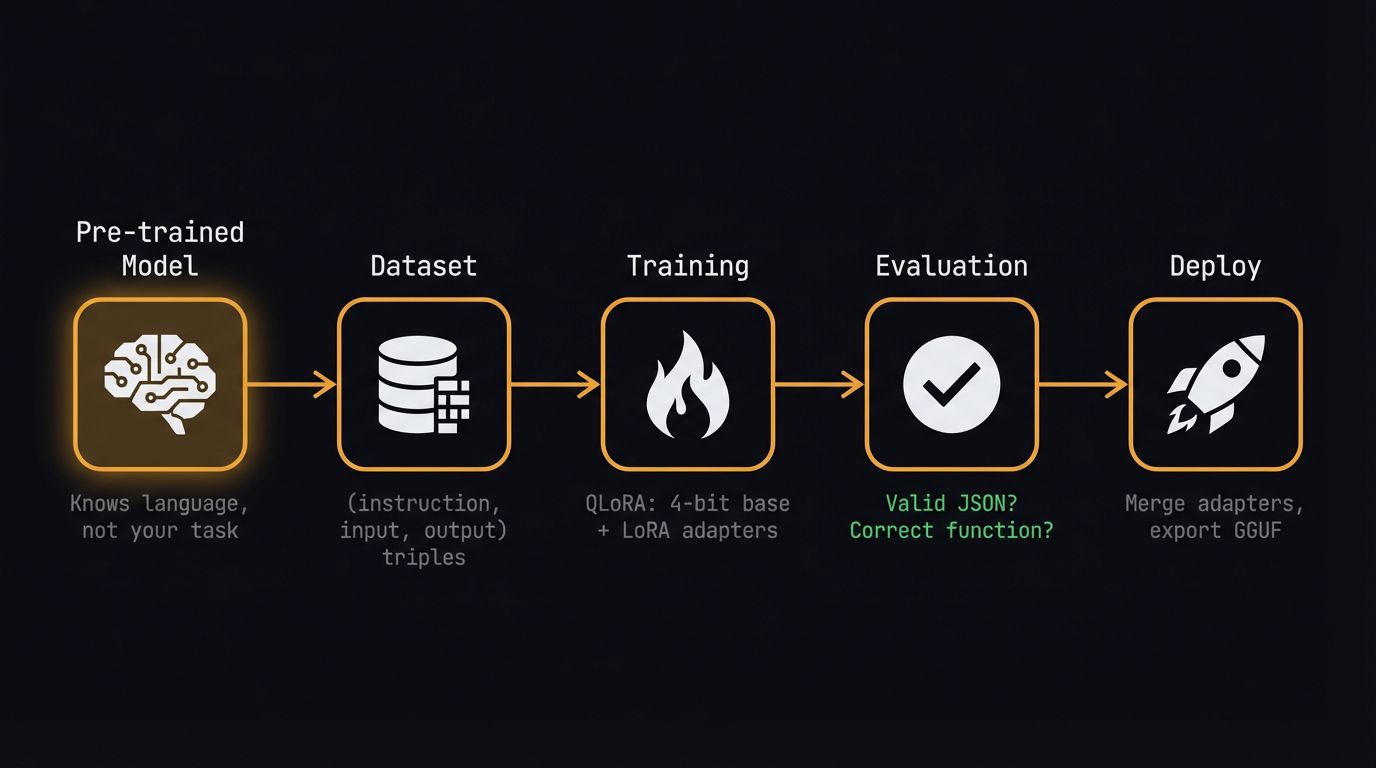
We are going to walk through every one of these steps in our Colab notebook today, transforming this flowchart into a deployable artifact. The pre-trained model already knows language — our job is to teach it a new skill: generating structured function calls.
2. Encoder vs Decoder — Two Paths
Before we spin up massive generative models, let’s acknowledge the traditional workhorses. If your task is strictly classification or NER on short texts, a compact encoder model like DistilBERT fits perfectly — think of it as a highly specialized filing clerk that reads a document and assigns a rigid label, easily fine-tuned in minutes using HuggingFace’s AutoModelForSequenceClassification.

The encoder architecture works beautifully for classification — the transformer processes tokenized text through attention layers, the CLS token gets routed through a task-specific head, and out comes a label. If you’ve used a ResNet backbone as a feature extractor for image classification, this setup should feel completely familiar.

But we don’t want labels. We want the model to generate structured JSON output — a function call with arguments. That means we need a decoder model, and that means instruction fine-tuning.
3. Instruction Fine-Tuning — The Key Idea
Think of a pre-trained base LLM as a brilliant but uncooperative intern who has read every book in the library but just blurts out related sentences when asked a question. Instruction fine-tuning is the orientation process that teaches them to actually read the ticket, follow the formatting rules, and deliver the specific deliverable you asked for.
We achieve this by formatting our training data into strict (instruction, input, output) triples. The critical insight:
Key idea: Function calling is simply instruction fine-tuning where the expected output happens to be a validated JSON object instead of natural language. The same mechanism that teaches a model to answer politely can teach it to output
{"name": "get_weather", "arguments": {"city": "Paris"}}.
4. LoRA — Train 1% of Parameters
Think of LoRA like applying a surgical software patch instead of rewriting the entire operating system. During training, we freeze the massive base weights and only train two tiny matrices, A (d×r) and B (r×d), where the rank r is our compression factor. For a 3B parameter model, this means we update roughly 1–5% of total parameters.

After training, we compute W_new = W + A·B and replace the original weights — giving us zero inference latency overhead. In our notebook, setting up this entire dual-path architecture takes exactly one line: model = get_peft_model(model, lora_config).
5. Quantization & QLoRA — Making It Fit
Precision formats are like suitcases: FP32 is the massive check-in bag holding every decimal detail, but it’s far too heavy for standard GPU memory. If we push compression all the way down to 4-bit integers, we get an 8× memory reduction — exactly the trick that lets us fit a 3B parameter model onto a free Colab T4.

QLoRA combines everything: a 4-bit quantized base model, 16-bit LoRA adapters, and a paged optimizer that offloads to CPU when needed. Think of it like bolting a small aftermarket turbocharger onto an engine rather than rebuilding the entire block from scratch.

| Component | Memory |
|---|---|
| Base model (4-bit) | ~1.7 GB |
| LoRA adapters (16-bit) | ~100 MB |
| Optimizer (8-bit) | ~1.5 GB |
| Activations | ~2 GB |
| Total | ~5.3 / 16 GB on T4 |

6. Evaluation & RAG vs Fine-Tuning

While tracking human preference via systems like the LMSYS Chatbot Arena is necessary for foundational chat models, it’s the wrong approach for our engineering task today. For our function-calling fine-tune, we use a simpler metric: does the model output valid JSON with the correct function name and arguments?
Before we start coding, we need to rule out the most common alternative to fine-tuning: Retrieval-Augmented Generation (RAG). Think of RAG as giving the model an open-book exam — it queries an external vector database at runtime to fetch facts.

Decision rule: If your data changes frequently → RAG. If you need the model to learn a new behaviour (structured output, tool use, persona) → Fine-tuning. We need fine-tuning.
7. What Is Function Calling?
Function calling is the backbone of every LLM agent system. Every tool-use system — ChatGPT plugins, Claude tools, LangChain agents — relies on the model generating structured function calls. Teaching a small model this skill makes it useful as a local, private agent.

Think of it like a restaurant order ticket: the LLM is the waiter taking your natural language request, but it doesn’t cook the food; it just writes down a highly structured ticket (the JSON) for the kitchen (your APIs). Your Python code then parses that JSON, executes the actual API call, and feeds the raw data back to the LLM for a final response.

8. The Training Data & The Goal
We use the Glaive Function Calling v2 dataset — 113K examples of user queries paired with the function calls the model should produce. Each example has three parts: system (available tools), user (natural language query), assistant (structured JSON output).

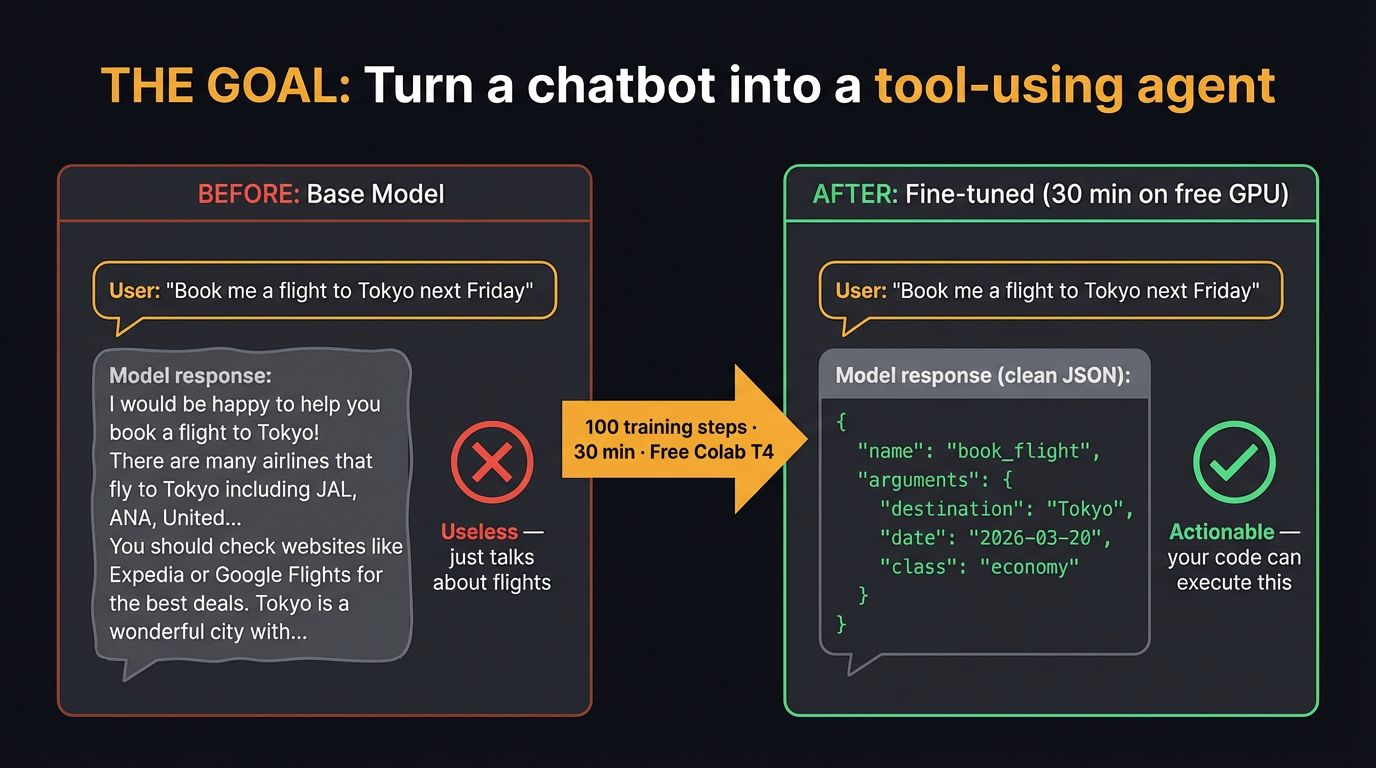
After 100 training steps (~30 minutes on a free T4), the model goes from generic text completion to outputting structured JSON function calls. That’s the power of instruction fine-tuning + LoRA:
9. 🚀 Hands-On: The Complete Tutorial
Everything below runs on a free Google Colab T4. We use Unsloth for optimized training kernels (2× faster, 60% less VRAM) with TRL’s SFTTrainer for the training loop.

Step 1: Install Unsloth
One cell handles all dependencies. Unsloth installs PyTorch, Transformers, TRL, bitsandbytes, and PEFT automatically.

%%capture
!pip install unsloth
!pip install --force-reinstall --no-cache-dir --no-deps \
    git+https://github.com/unslothai/unsloth.git
Step 2: Load Model with 4-bit Quantization
The key line is load_in_4bit=True. This triggers QLoRA’s 4-bit NF4 quantization on the base model, compressing 3B parameters from ~12 GB down to ~1.7 GB.

from unsloth import FastLanguageModel
import torch

model, tokenizer = FastLanguageModel.from_pretrained(
    model_name="unsloth/Qwen2.5-3B-Instruct",
    max_seq_length=2048,
    dtype=None,           # auto-detect: bfloat16 on T4
    load_in_4bit=True,    # QLoRA: 4-bit quantized base
)

print(f"Model loaded: {model.config._name_or_path}")
print(f"Parameters: {sum(p.numel() for p in model.parameters()):,}")
Why Qwen 2.5 3B? Best quality/size ratio for Colab. Instruction-tuned base. Apache 2.0 license. Strong multilingual support. Fits comfortably on T4 with 4-bit quantization.
Step 3: Add LoRA Adapters
This is where the QLoRA diagram from earlier becomes code. We target all 7 attention and MLP projections. With rank r=16, we train roughly 1.5% of total parameters.

model = FastLanguageModel.get_peft_model(
    model,
    r=16,                          # LoRA rank
    target_modules=[
        "q_proj", "k_proj", "v_proj", "o_proj",
        "gate_proj", "up_proj", "down_proj",
    ],
    lora_alpha=16,
    lora_dropout=0,                # Unsloth optimized: 0 is faster
    bias="none",
    use_gradient_checkpointing="unsloth",  # 60% less VRAM
    random_state=3407,
)

trainable = sum(p.numel() for p in model.parameters() if p.requires_grad)
total = sum(p.numel() for p in model.parameters())
print(f"Trainable: {trainable:,} / {total:,} ({100*trainable/total:.1f}%)")
Step 4: Load the Function Calling Dataset
Glaive Function Calling v2 contains 113K examples of user queries paired with the expected function calls.

from datasets import load_dataset

# Glaive Function Calling v2: 113k examples of user queries + function calls
dataset = load_dataset("glaiveai/glaive-function-calling-v2", split="train")
print(f"Dataset size: {len(dataset):,}")
print(f"Example keys: {list(dataset[0].keys())}")

# Preview one example
print("\n--- Example ---")
print(dataset[0]["system"][:200])
print("...")
print(dataset[0]["chat"][:300])
Step 5: Format into Chat Template
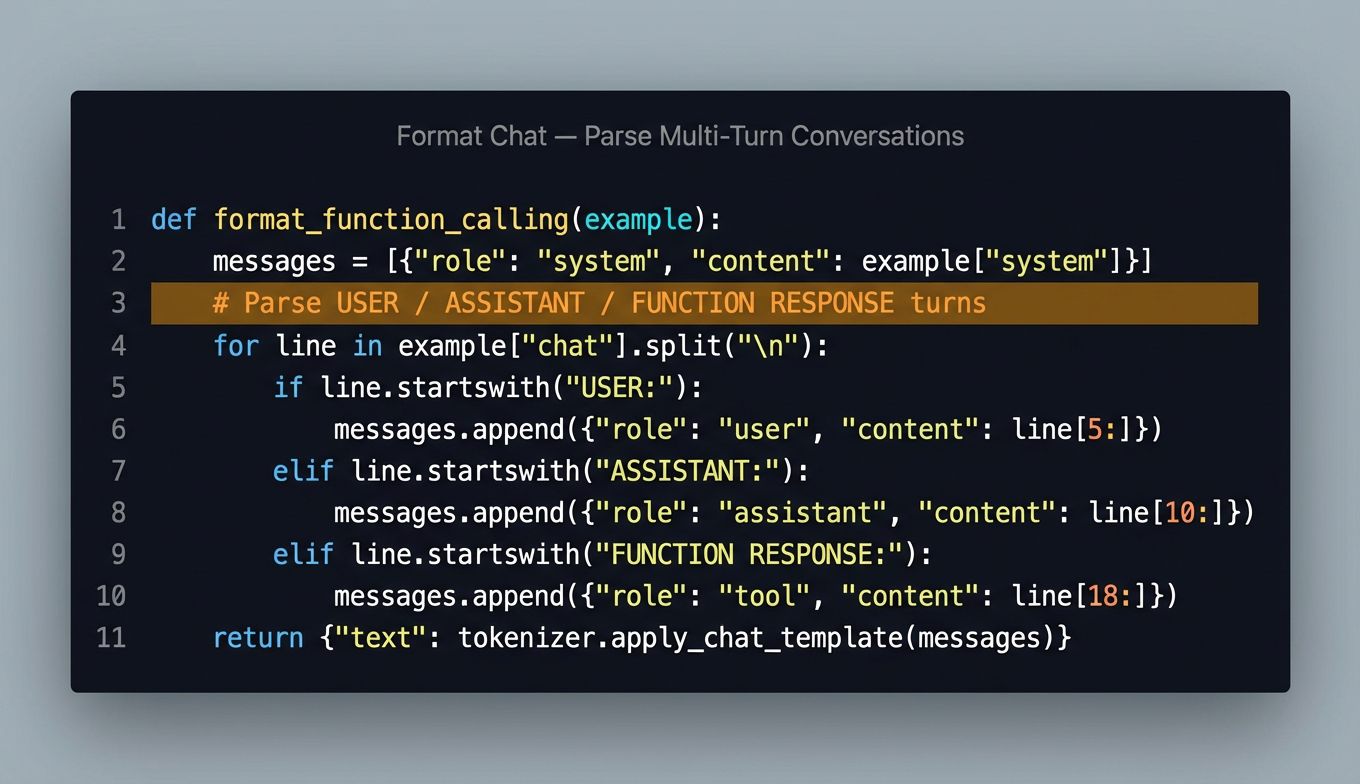
We parse the raw Glaive format (which uses USER:/ASSISTANT:/FUNCTION RESPONSE: markers) into Qwen’s chat template. The tokenizer handles the special tokens automatically.
def format_function_calling(example):
    """Convert Glaive format to Qwen chat template."""
    system_prompt = example["system"].strip()
    chat = example["chat"].strip()

    messages = []
    messages.append({"role": "system", "content": system_prompt})

    # Split chat into USER/ASSISTANT/FUNCTION turns
    lines = chat.split("\n")
    current_role = None
    current_content = []

    for line in lines:
        line = line.strip()
        if line.startswith("USER:"):
            if current_role:
                messages.append({"role": current_role,
                                 "content": "\n".join(current_content).strip()})
            current_role = "user"
            current_content = [line[5:].strip()]
        elif line.startswith("ASSISTANT:"):
            if current_role:
                messages.append({"role": current_role,
                                 "content": "\n".join(current_content).strip()})
            current_role = "assistant"
            current_content = [line[10:].strip()]
        elif line.startswith("FUNCTION RESPONSE:"):
            if current_role:
                messages.append({"role": current_role,
                                 "content": "\n".join(current_content).strip()})
            current_role = "tool"
            current_content = [line[18:].strip()]
        elif line:
            current_content.append(line)

    if current_role and current_content:
        messages.append({"role": current_role,
                         "content": "\n".join(current_content).strip()})

    text = tokenizer.apply_chat_template(
        messages, tokenize=False, add_generation_prompt=False,
    )
    return {"text": text}

dataset = dataset.map(format_function_calling, num_proc=4)
print(dataset[0]["text"][:500])
Step 6: Configure the Trainer
We use TRL’s SFTTrainer with sequence packing enabled — this packs multiple short examples into a single sequence for faster training.

from trl import SFTTrainer
from transformers import TrainingArguments
from unsloth import is_bfloat16_supported
trainer = SFTTrainer(
model=model,
tokenizer=tokenizer,
train_dataset=dataset,
dataset_text_field="text",
max_seq_length=2048,
dataset_num_proc=2,
packing=True, # Pack short examples together = faster
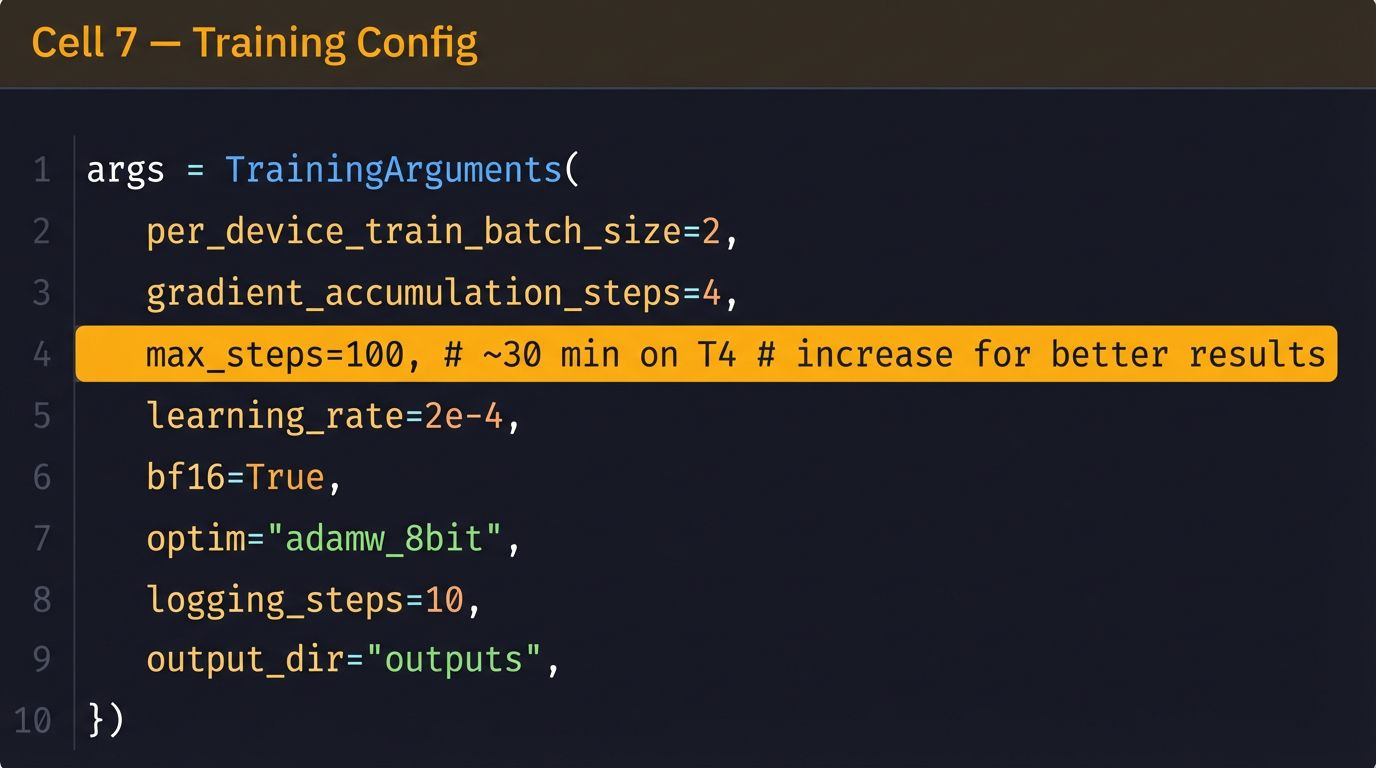
args=TrainingArguments(
per_device_train_batch_size=2,
gradient_accumulation_steps=4, # Effective batch = 8
warmup_steps=10,
max_steps=100, # ~30 min on T4, increase for better results
learning_rate=2e-4,
fp16=not is_bfloat16_supported(),
bf16=is_bfloat16_supported(),
logging_steps=10,
optim="adamw_8bit",
weight_decay=0.01,
lr_scheduler_type="linear",
seed=3407,
output_dir="outputs",
report_to="none",
),
)Step 7: Hyperparameters
Step 8: Train!
The moment of truth. Three lines of code, 30 minutes of GPU time.

# Show memory before training
gpu_stats = torch.cuda.get_device_properties(0)
print(f"GPU: {gpu_stats.name} ({gpu_stats.total_mem / 1024**3:.1f} GB)")

# Train
trainer_stats = trainer.train()

print(f"\nTraining complete!")
print(f"  Steps: {trainer_stats.global_step}")
print(f"  Loss:  {trainer_stats.metrics['train_loss']:.4f}")
print(f"  Time:  {trainer_stats.metrics['train_runtime']:.0f}s")
Step 9: Define Test Tools
Before testing inference, we define the tools our model should call — a JSON schema of available functions:

system_prompt = """You are a helpful assistant with access to the following functions:

[
  {
    "name": "get_weather",
    "description": "Get current weather for a city",
    "parameters": {
      "type": "object",
      "properties": {
        "city": {"type": "string", "description": "City name"},
        "unit": {"type": "string", "enum": ["celsius", "fahrenheit"]}
      },
      "required": ["city"]
    }
  },
  {
    "name": "search_restaurants",
    "description": "Search for restaurants near a location",
    "parameters": {
      "type": "object",
      "properties": {
        "location": {"type": "string"},
        "cuisine": {"type": "string"},
        "price_range": {"type": "string", "enum": ["$", "$", "$$"]}
      },
      "required": ["location"]
    }
  }
]

To call a function, respond with a JSON object:
{"name": "function_name", "arguments": {...}}"""
Step 10: Test the Fine-Tuned Model
Switch to inference mode and test with real queries. The model should now output clean JSON function calls instead of generic text.
FastLanguageModel.for_inference(model)  # Switch to fast inference mode

test_queries = [
    "What's the weather like in Tokyo?",
    "Find me some Italian restaurants in San Francisco under $$",
    "Is it cold in Berlin right now?",
]

for query in test_queries:
    messages = [
        {"role": "system", "content": system_prompt},
        {"role": "user", "content": query},
    ]
    inputs = tokenizer.apply_chat_template(
        messages,
        tokenize=True,
        add_generation_prompt=True,
        return_tensors="pt",
    ).to("cuda")

    outputs = model.generate(
        input_ids=inputs,
        max_new_tokens=256,
        temperature=0.1,
        do_sample=True,
    )
    response = tokenizer.decode(
        outputs[0][inputs.shape[-1]:], skip_special_tokens=True
    )

    print(f"\nQ: {query}")
    print(f"A: {response}")
    print("-" * 50)
Step 11: Save & Export
Save the LoRA adapter (~50 MB) or merge and export as GGUF for local inference with Ollama or llama.cpp.

# Save LoRA adapter (small — ~50MB)
model.save_pretrained("qwen25-3b-function-calling-lora")
tokenizer.save_pretrained("qwen25-3b-function-calling-lora")
print("LoRA adapter saved!")

# Optional: merge and save full model in GGUF for llama.cpp / Ollama
# model.save_pretrained_gguf(
#     "qwen25-3b-fc", tokenizer, quantization_method="q4_k_m"
# )

# Optional: push to HuggingFace Hub
# model.push_to_hub("your-username/qwen25-3b-function-calling", token="hf_...")
10. Results — Before vs After

After 100 training steps (~30 minutes on a free T4), the model goes from generic text completion to outputting structured JSON function calls. The LoRA adapter is only ~50 MB — you can distribute it, version it, and swap it out without touching the base model weights.
| Metric | Result |
|---|---|
| Training time | ~30 min on free Colab T4 |
| VRAM used | 5.3 / 16 GB |
| Parameters trained | 1.5% (LoRA r=16) |
| Adapter size | ~50 MB |
| Output | Valid JSON with correct function names |
| Export | GGUF for Ollama / llama.cpp |
What’s Next?
- Increase steps: 500–1000 steps for production quality
- Add validation: Write a validation loop that checks JSON validity and function name accuracy
- Build an agent: Wrap the fine-tuned model in a LangChain/LlamaIndex agent with real API tools
- Try other tasks: Text-to-SQL, JSON extraction, code generation — same technique, different dataset
11. Appendix: Full Colab Code
Copy each cell into a Google Colab notebook. Runtime: GPU → T4.
Cell 1: Install
%%capture
!pip install unsloth
!pip install --force-reinstall --no-cache-dir --no-deps \
    git+https://github.com/unslothai/unsloth.git
Cell 2: Load Model
from unsloth import FastLanguageModel
import torch
model, tokenizer = FastLanguageModel.from_pretrained(
    model_name="unsloth/Qwen2.5-3B-Instruct",
    max_seq_length=2048, dtype=None, load_in_4bit=True,
)
print(f"Parameters: {sum(p.numel() for p in model.parameters()):,}")
Cell 3: LoRA
model = FastLanguageModel.get_peft_model(
    model, r=16,
    target_modules=["q_proj","k_proj","v_proj","o_proj","gate_proj","up_proj","down_proj"],
    lora_alpha=16, lora_dropout=0, bias="none",
    use_gradient_checkpointing="unsloth", random_state=3407,
)
Cell 4: Dataset
from datasets import load_dataset
dataset = load_dataset("glaiveai/glaive-function-calling-v2", split="train")
Cell 5: Format
def format_function_calling(example):
    system_prompt = example["system"].strip()
    chat = example["chat"].strip()
    messages = [{"role": "system", "content": system_prompt}]
    lines = chat.split("\n")
    current_role, current_content = None, []
    for line in lines:
        line = line.strip()
        if line.startswith("USER:"):
            if current_role: messages.append({"role": current_role, "content": "\n".join(current_content).strip()})
            current_role, current_content = "user", [line[5:].strip()]
        elif line.startswith("ASSISTANT:"):
            if current_role: messages.append({"role": current_role, "content": "\n".join(current_content).strip()})
            current_role, current_content = "assistant", [line[10:].strip()]
        elif line.startswith("FUNCTION RESPONSE:"):
            if current_role: messages.append({"role": current_role, "content": "\n".join(current_content).strip()})
            current_role, current_content = "tool", [line[18:].strip()]
        elif line: current_content.append(line)
    if current_role: messages.append({"role": current_role, "content": "\n".join(current_content).strip()})
    return {"text": tokenizer.apply_chat_template(messages, tokenize=False, add_generation_prompt=False)}
dataset = dataset.map(format_function_calling, num_proc=4)
Cell 6: Trainer
from trl import SFTTrainer
from transformers import TrainingArguments
from unsloth import is_bfloat16_supported
trainer = SFTTrainer(
    model=model, tokenizer=tokenizer, train_dataset=dataset,
    dataset_text_field="text", max_seq_length=2048, dataset_num_proc=2, packing=True,
    args=TrainingArguments(
        per_device_train_batch_size=2, gradient_accumulation_steps=4,
        warmup_steps=10, max_steps=100, learning_rate=2e-4,
        fp16=not is_bfloat16_supported(), bf16=is_bfloat16_supported(),
        logging_steps=10, optim="adamw_8bit", weight_decay=0.01,
        lr_scheduler_type="linear", seed=3407, output_dir="outputs", report_to="none",
    ),
)
Cell 7: Train
trainer_stats = trainer.train()
print(f"Loss: {trainer_stats.metrics['train_loss']:.4f}")
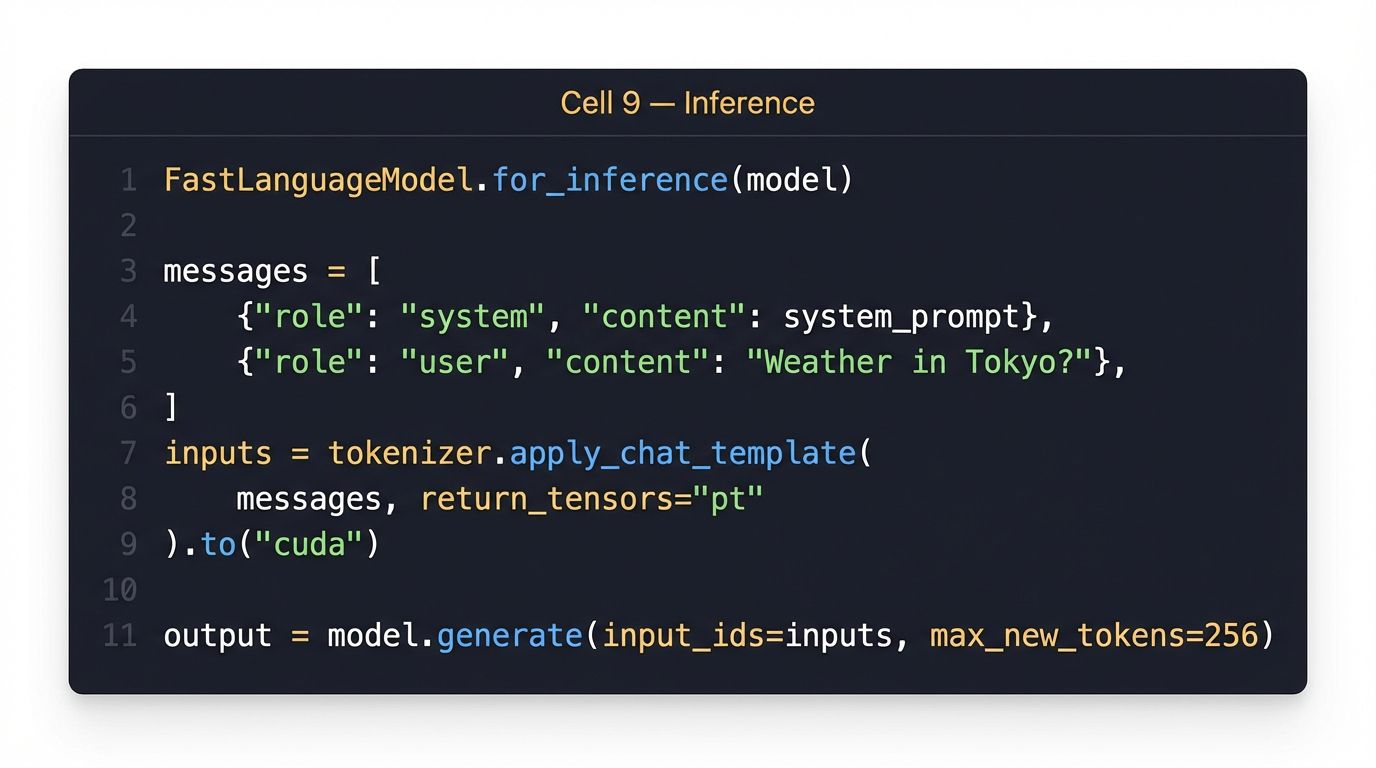
print(f"Time: {trainer_stats.metrics['train_runtime']:.0f}s")Cell 8: Inference
FastLanguageModel.for_inference(model)
system_prompt = """You are a helpful assistant with access to these functions:
[{"name":"get_weather","parameters":{"city":{"type":"string"},"unit":{"type":"string"}}},
 {"name":"search_restaurants","parameters":{"location":{"type":"string"},"cuisine":{"type":"string"}}}]
Respond with JSON: {"name":"...","arguments":{...}}"""

for q in ["Weather in Tokyo?", "Italian restaurants in SF?", "Cold in Berlin?"]:
    msgs = [{"role":"system","content":system_prompt},{"role":"user","content":q}]
    ids = tokenizer.apply_chat_template(msgs, tokenize=True, add_generation_prompt=True, return_tensors="pt").to("cuda")
    out = model.generate(input_ids=ids, max_new_tokens=256, temperature=0.1, do_sample=True)
    print(f"Q: {q}\nA: {tokenizer.decode(out[0][ids.shape[-1]:], skip_special_tokens=True)}\n")
Cell 9: Save
model.save_pretrained("qwen25-3b-function-calling-lora")
tokenizer.save_pretrained("qwen25-3b-function-calling-lora")