#004 How to smooth and sharpen an image in OpenCV?

Highlight: In our previous posts we mastered some basic image processing techniques and now we are ready to move on to more advanced concepts. In this post, we are going to explain how to blur and sharpen images. When we want to blur or sharpen our image, we need to apply a linear filter. You will learn several types of filters that we often use in the image processing In addition, we will also show you how to create a custom filters. So, without further delay let’s start with our post.
Tutorial Overview:
- What is an image filtering?
- How to smooth an image in OpenCV?
- How to sharpen an image?
- Creating Instagram like filters
1. What is an image filtering?
First of all, let’s introduce a concept of filtering. The filter is actually a small matrix that we will use to sharpen or blur our original image. In order to do that we need to perform an operation of convolution. As it is always the case with most important concepts let’s quickly refresh our knowledge of convolution.
As you can see at the GIF animation below (left), we have a matrix of \(6\times 6 \) pixels that represents our image. Next, we perform a convolution operation with a \(3\times 3 \) filter. The final product of this convolution process will be a \(4\times 4 \) matrix. In order to calculate the first element (top left corner) of this \(4\times 4 \) matrix, we take a \(3\times 3 \) filter and place it at the top of the \(3\times 3 \) region of the input image. Then, we take a product of each corresponding element and add them together as you can see in the formula below.

So, after evaluating the first expression we obtained the result of -5. This will be a pixel value at the top left corner in the output image. Then we move our filter across the overall image an create an output image . Notice that our filter is a matrix with the same height and width (\(3\times 3 \), \(5\times 5 \), \(9\times 9 \)). There is a very good reason for that. We always use an odd number because we need a pixel at the center of this matrix.
So, we have reminded ourselves how to apply a convolution on images. In a process of convolution we can use a variety of filters. By using different filter coefficients we perform blurring, sharpening and other image processing effects.
2. How to smooth an image in OpenCV?
Let’s see how we can smooth or blur an image. Now, you may ask yourself “Why do I have to blur my image”? Well, while blurring may be undesirable in the pictures, it will be quite useful later when we start to work with more advanced OpenCV functions. For instance it is used in image thresholding and edge detection. In addition, these blurring techniques are commonly used to reduce noise, and we can also apply them to reduce the pixelated effect in low-resolution images.
OpenCV provides a large number of different types of blurring methods. So, let’s explore some of them.
Averaging filter
In the picture below we can see that the input image on the left is processed with the averaging filter (box filter). Here, all the coefficient values have the same value of 1/9. After we have applied convolution operator, we have generated our output image on the right. It is good to know that as a filter size increases our image will become more blurred.

To perform averaging in OpenCV we use both cv2.blur()and cv2.boxFilter() functions. There are only two arguments required: an image that we want to blur and the size of the filter. We have chosen three different sizes for the filter to demonstrate that the output image will become more blurred as the filter size increases.
The result of the filtering is combined and stack with a function np.hstack().
# Necessary imports
import cv2
import numpy as np
#  Importing function cv2_imshow necessary for programing in Google Colab
from google.colab.patches import cv2_imshow
# Loading the image
# Integer 0 indicates that we want to load a grayscale image
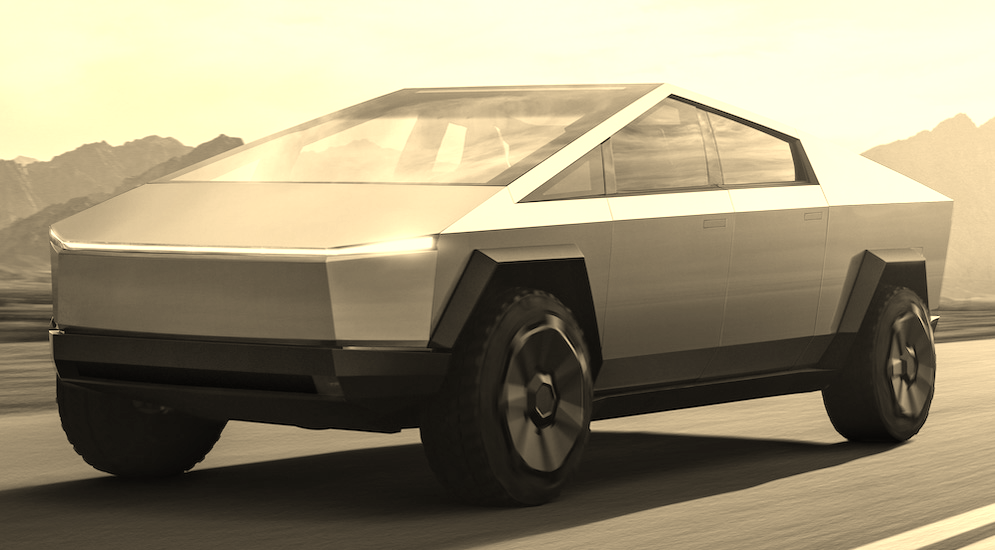
img1 = cv2.imread('Cybertruck.jpg',0)
img2 = cv2.imread('logo.png',0)
cv2_imshow(img)
cv2_imshow(img2)Output:
# Performing averaging blurring on our Cybertruck image
# Filters - left (3,3), middle(5,5), right(9,9)
blurred_1 = np.hstack([
  cv2.blur(img1,(3,3)),
  cv2.blur(img1,(5,5)),
  cv2.blur(img1,(9,9))])
cv2_imshow(blurred_1)
# Performing averaging blurring on our Logo image
# Filters - left (3,3), middle(5,5), right(9,9)
blurred_2 = np.hstack([
cv2.blur(img2,(3,3)),
cv2.blur(img2,(5,5)),
cv2.blur(img2,(9,9))])
cv2_imshow(blurred_2)Output:


As we can see our output images are quite blurred. However, there are some problems with that. When we want to smooth an image our goal is to remove noise, bat we want to preserve smooth behavior of our edges in the image. However, we can see that the Averaging filter gives rather poor blurring result. This is due to the fact that all pixel within a filter matrix have the same coefficients. We will see that a better result will be obtained with the Gaussian filter where more emphasis is a given to the central area. On the other hand, the peripheral pixels have relatively smaller impact on the filtering with a Gaussian matrix.
Gaussian filter
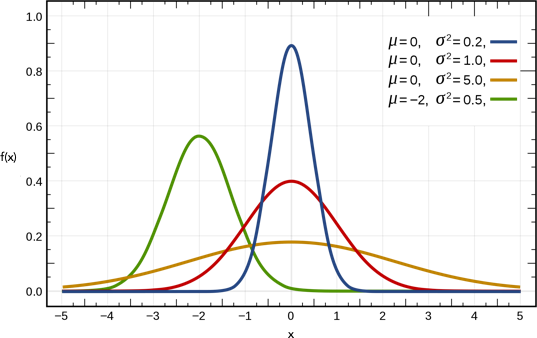
Apart from the averaging filter we can use several other common filters to perform image blurring. Now we are going to explore a slightly more complicated filter. It is the most commonly used kernel in image processing and it is called the Gaussian filter. For the creation of this filter we use the famous Gaussian function. This function represents the probability that events are centered around the mean value. Furthermore, the standard deviation \((\sigma) \) of this function controls how wide this distribution would be. By sampling this function values we will get coefficients for a Gaussian filter matrix. Effect of different \((\sigma) \) values can be observed in the following image.
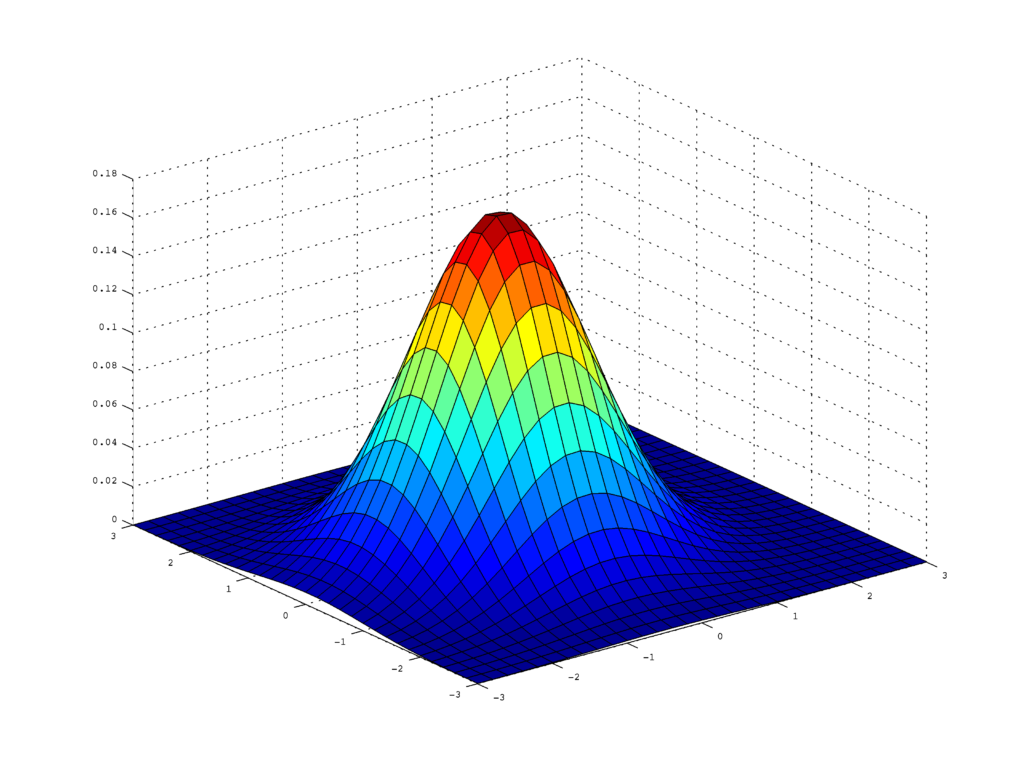
In the image below we can see a 2D Gaussian distribution. Now, when you look at it in 3D, it becomes more obvious how the coefficient values are generated.
Now, when we know what is a Gaussian distribution we can focus on our code. Here, we will use a function cv2.GaussianBlur(). Similarly to a averaging filter, we provide a tuple that represents our filter size. This is how our \(3\times 3 \) filter looks like:
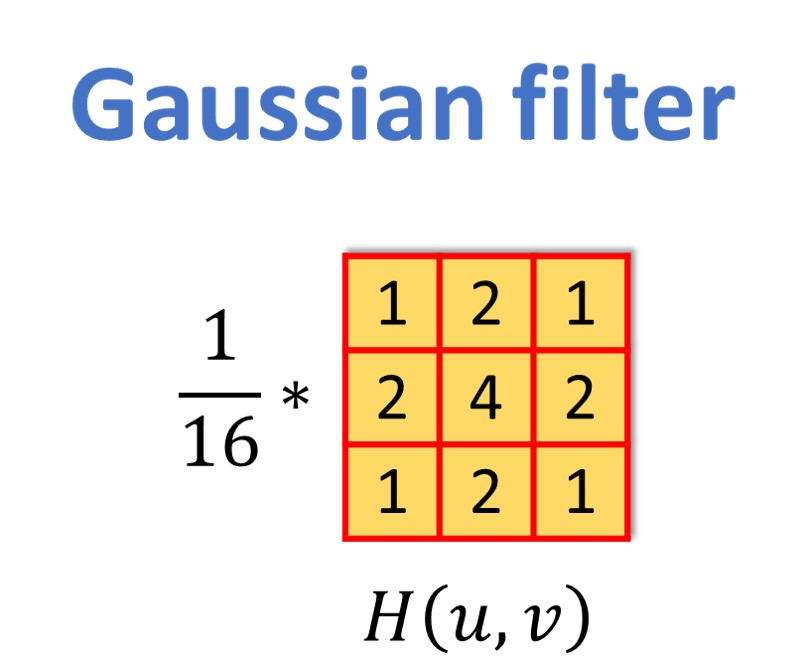
We may add arguments \(\sigma _{x} \) – standard deviation in the \(x \) -direction, and \(\sigma _{y} \) – standard deviation in the \(y \) direction of our Gaussian kernel.
# Performing Gaussian blurring on our Cybertruck image
Gaussian_blurred_1 = np.hstack([
  cv2.GaussianBlur(img1,(3,3),0),
  cv2.GaussianBlur(img1,(5,5),0),
  cv2.GaussianBlur(img1,(9,9),0)])
cv2_imshow(Gaussian_blurred_1)
# Performing Gausssian blurring on our Logo image
Gaussian_blurred_2 = np.hstack([
cv2.GaussianBlur(img2,(3,3),0),
cv2.GaussianBlur(img2,(5,5),0),
cv2.GaussianBlur(img2,(9,9),0)])
cv2_imshow(Gaussian_blurred_2)Output:


As you can see our image filtered with Gaussian filter is less, but more naturally blurred. Why? Because all pixels in the kernel neighborhood of an averaging filter have equal weight. On the other hand, in Gaussian filter there are higher values at center pixels and the lower values in pixels moving away from the center. That is why with Gaussian filter we preserve edges which will appear sharper in our output image.
3. How to sharpen an image?
The process of sharpening is usually used to enhance edges in an image. There are many filters that we can use but one that can sharpen our image is represented in a matrix below.
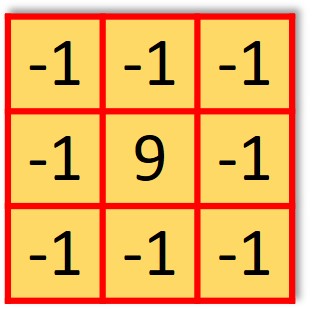
As you can see this filter has a positive 9 in a center, whereas it has -1 at all other places. For this particular filter we don’t have an implemented OpenCV function. Therefore, we will use a function cv2.filter2D() which will process our image with an arbitrary filter. This filter is often used for sharpening colored images.
img1 = cv2.imread('Cybertruck.jpg',1)
# Creating our sharpening filter
filter = np.array([[-1, -1, -1], [-1, 9, -1], [-1, -1, -1]])
# Applying cv2.filter2D function on our Cybertruck image
sharpen_img_1=cv2.filter2D(img1,-1,filter)
cv2_imshow(sharpen_img_1)
img2 = cv2.imread('logo.png',1)
# Creating our sharpening filter
filter = np.array([[-1, -1, -1], [-1, 9, -1], [-1, -1, -1]])
# Applying cv2.filter2D function on our Logo image
sharpen_img_2=cv2.filter2D(img2,-1,filter)
cv2_imshow(sharpen_img_2)Output:


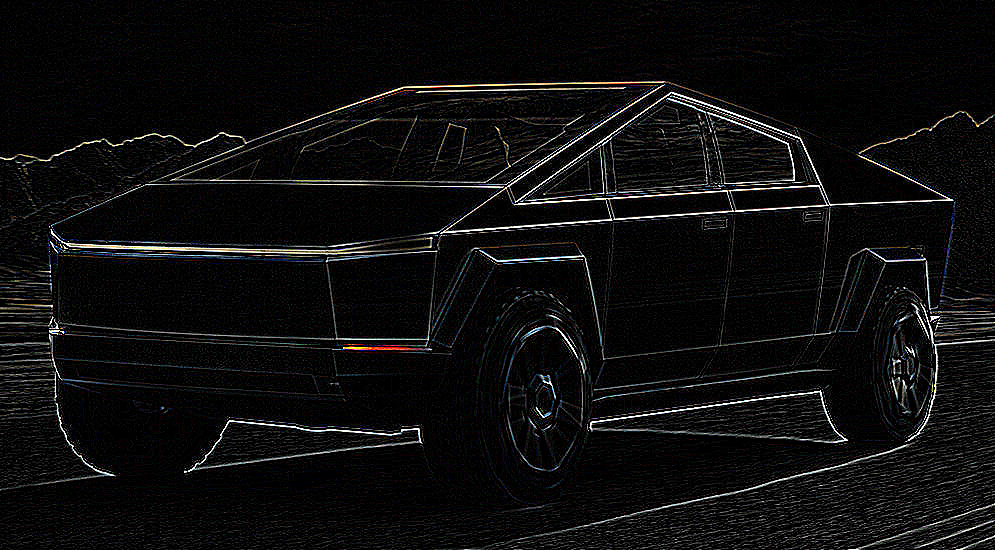
So, another popular version of a sharpening filter is so called Mexican hat or Laplacian filter. Here we give an example of a \(5\times 5 \) filter that we will use to process our image. The result of this processing is given in the image below. We have processed both a “Cybertruck” image and “dataHacker” logo. You can notice that the output image has preserved the edges in our image.
# Creating maxican hat filter
filter = np.array([[0,0,-1,0,0],[0,-1,-2,-1,0],[-1,-2,16,-2,-1],[0,-1,-2,-1,0],[0,0,-1,0,0]])
# Applying cv2.filter2D function on our Cybertruck image
mexican_hat_img1=cv2.filter2D(img1,-1,filter)
cv2_imshow(mexican_hat_img1)
# Creating maxican hat filter
filter = np.array([[0,0,-1,0,0],[0,-1,-2,-1,0],[-1,-2,16,-2,-1],[0,-1,-2,-1,0],[0,0,-1,0,0]])
# Applying cv2.filter2D function on our Logo image
mexican_hat_img2=cv2.filter2D(img2,-1,filter)
cv2_imshow(mexican_hat_img2)Output:

Creating our own filter
As we have already seen OpenCV provides a function cv2.filter2D()to process our image with some arbitrary filter. So, let’s create our custom filter. We just want to emphasize here that this filter will be a matrix usually of a size \(3\times 3 \) or \(5\times 5 \). By setting coefficient filter values we can perform different kind of filtering. For instance, we have added a following numbers and we will process our image with a random filter.
filter_2 = np.array([[3, -2, -3], [-4, 8, -6], [5, -1, -0]])In the image below we have obtained the output result. It is interesting to know that this filter has an argument -1. This argument represents that the output image will be of the same depth as the input image. That means that if we have processed a gray image with our filter, the output will be a gray image with one channel. On the other hand, if our input is colored image, then the output will also be a colored image with 3 channels (BGR).
# Creating our arbitrary filter
filter = np.array([[3, -2, -3], [-4, 8, -6], [5, -1, -0]])
# Applying cv2.filter2D on our Cybertruck image
custom_img_1=cv2.filter2D(img1,-1,filter)
cv2_imshow(custom_img_1)
# Creating our arbitrary filter
filter = np.array([[3, -2, -3], [-4, 8, -6], [5, -1, -0]])
# Applying cv2.filter2D on our Logo image
custom_img_2=cv2.filter2D(img2,-1,filter)
cv2_imshow(custom_img_2)Output:


4. Creating Instagram like filters
Sepia effect filter
We can also create very interesting filtering effects using a slightly different image processing. Do note that here we are not applying a convolution, but we are performing a transformation of colors. This is done in the following way and illustrated quiet intuitively in the code. The process to create a sepia effect includes the following steps. First, we split our channels. Red, green and blue channels are multiplied with certain coefficients and they have created new values for the red, green and blue. After we have processed them, we obtained new channels for red, green and blue. Once this is finished, we create our final output image by merging channels back in a new red, new green and new blue. Finally, we plot our image and we can see the sepia effect that we have created. It resembles old brown pigment that was widely used by photographers back in the early days of photography.
(b,g,r)=cv2.split(img1)
r_new = r*0.393 + g*0.769 + b*0.189
g_new = r*0.349 + g*0.686 + b*0.168
b_new = r*0.272 + g*0.534 + b*0.131
img_new=cv2.merge([b_new, g_new, r_new])
cv2_imshow(img_new)
Output:
Other way to achieve the same effect is to apply the function cv2.transform(). First, we will create our sepia effect by storing the same coefficients from the previous example into our filter matrix. Then, we will process our image with a sepia filter with the function cv2.transform(). As you can see we obtained identical result.

# Creating our sepia filter
filter = np.array([[0.272, 0.534, 0.131],
                   [0.349, 0.686, 0.168],
                   [0.393, 0.769, 0.189]])
# Applying cv2.transform function
sepia_img=cv2.transform(img1,filter)
cv2_imshow(sepia_img)
Emboss effect
Here we will illustrate one interesting effect called emboss. There are several filters that we can use depending on the direction of the filter. We can have vertical, horizontal or even diagonal version of this filter. In our case we will use a vertical one, and once we filter our image, we will get the difference that is very low, meaning that the output image will be rather black. Therefore, we will add a constant of 128 to each pixel and we will obtain a resulting image in gray. This example demonstrate how we can create an emboss effect.

# Creating our emboss filter
filter = np.array([[0,1,0],[0,0,0],[0,-1,0]])
# Applying cv2.filter2D function on our Cybertruck image
emboss_img_1=cv2.filter2D(img1,-1,filter)
emboss_img_1=emboss_img_1+128
cv2_imshow(emboss_img_1)
# Creating our emboss filter
filter = np.array([[0,1,0],[0,0,0],[0,-1,0]])
# Applying cv2.filter2D function on our Logo image
emboss_img_1=cv2.filter2D(img2,-1,filter)
emboss_img_1=emboss_img_1+128
cv2_imshow(emboss_img_1)Output:


In the following picture you can see the effect of applying different filters on the same image. We hope that you enjoyed this post and that you will have fun playing with different filters to enhance your computer vision projects.

Summary
In this chapter, we have reviewed the most common filters that we can use for blurring, sharpening or for creating a cool effects in our images. Note that this post does not cover a theoretical aspects of filtering, but puts more focus on the practical and interesting applications. In the next post we will learn basic arithmetic and logical operations that we can apply on our images.
References:
[1] Practical Python and OpenCV by Adrian Rosebrock
[2] Mastering OpenCV 4 with Python by Alberto Fernández Villán
[3] Python OpenCV: Building Instagram-Like Image Filters