#003 OpenCV projects – How to create Instagram like filters, mustaches, glasses, and masks?
Highlights: In this post, we are going to have some fun. We will apply Haar cascade classifiers to detect faces, and different parts of the face in a video such as eyes, and mouth. Then, we will learn how to place funny objects like masks, mustaches, or glasses over the detected part of a face.
Tutorial overview:
- Introduction
- How to put a mask over the face?
- How to put a mustache over the face?
- How to put glasses over the face?
1. Introduction
Considering that you are our loyal reader :-), you must have learned a lot about face detection with Haar cascade classifiers from our previous posts. In case you need to refresh your knowledge you can click on the image below where you can find a detailed explanation on this topic.

Now when we have reminded ourselves what Haar cascade classifiers are we can apply that knowledge and start to have some fun. Lets’s see what we can do.
2. How to put a mask over the face?
In the middle of a COVID -19 pandemic, we think that everyone must wear a mask to protect themselves and others. That is why we will teach you how to how to put a mask on top of a face using OpenCV. Another reason we are doing this is that this can assist you to create very simple dataset creation. This dataset creation you can use afterward to create a classifier to detect whether a person is wearing a mask or not.
First, you need to upload a picture of the mask to your Google colab session. Then, we will import the necessary libraries, load the video, and create a video capture object.

import cv2
from google.colab.patches import cv2_imshowCode language: JavaScript (javascript)
In this case, we will put a mask not only on a single image but on a video of a person that is standing still.
# Load video
vid_location = "Video.mp4"
cap = cv2.VideoCapture(vid_location)Code language: PHP (php)
Now, we need to load Haar cascade files using the function cv2.CascadeClassifier(). In this function, we have a parameter cv2.data.haarcascades that will return the location of the Haar Cascade files.
# Load our classifiers
face_classifier = cv2.CascadeClassifier(cv2.data.haarcascades + "haarcascade_frontalface_default.xml")
eye_classifier = cv2.CascadeClassifier(cv2.data.haarcascades + "haarcascade_eye.xml")
smile_classifier = cv2.CascadeClassifier(cv2.data.haarcascades + "haarcascade_smile.xml")Code language: PHP (php)
The next step is to create a cv2.VideoWriter() object. Whit this we will record the final output video. One parameter that we need for this is to use the method cap.get() that will give us the necessary width and height of the input video. That is because we want to have the same height and width of both an input and output video. Moreover, we need to define two more parameters: fourcc codec and the number of frames which in our case is 30.
# Grab the width and height of the input video
frame_width = int(cap.get(3))
frame_height = int(cap.get(4))

# Create the video writer for MP4 format
out = cv2.VideoWriter('outpyt_3.mp4',cv2.VideoWriter_fourcc(*'MP4V'), 30.0, (frame_width,frame_height))Code language: PHP (php)
Now, we are ready to detect the face on our video and to overlay the mask over it. With the following line of code, we will load the picture of the mask and read the dimensions of that image. In the case that the video frame and mask are not proportional we can adjust their dimensions by using scaling_factor. In our case due to the simplicity of the code our scaling_factor is equal to 1.
face_mask = cv2.imread('mask.jpg')
h_mask, w_mask = face_mask.shape[:2]
scaling_factor = 1Code language: JavaScript (javascript)
Next, we need to create a while loop that reads frames from our video continuously. The important thing that we need to do is to resize the video frame to match the dimensions of the mask image. And in the last line of code, we convert the video frame into a grayscale wit a function cv2.cvtColor().
while True:
	ret, frame = cap.read()
	if ret:
		frame = cv2.resize(frame, None, fx=scaling_factor,  fy=scaling_factor, interpolation=cv2.INTER_AREA)
 # Convert image into grayscale
		gray = cv2.cvtColor(frame, cv2.COLOR_BGR2GRAY)Code language: PHP (php)
The process of covering the detected face with the mask consists of several steps. We can better visualize these steeps if we look at the following graph.

Now, let’s detect the faces in the video and store them in the variable face_rects.
# Detect the faces
face_rects = face_classifier.detectMultiScale(gray, 1.3, 5) Code language: PHP (php)
Now, we are creating a for loop in order to iterate through every detected face. We also need to adjust the height parameter and weight parameter. It will take some time to get the right number if you want the mask to be perfectly positioned on the face. It is important to note that height and width must be an integer data type.
# Adjust the height and weight parameters
 for (x,y,w,h) in face_rects:
        if h > 0 and w > 0:

          h, w = int(1.4*h), int(1.2*w)
          y += 25
          x -= 17Code language: PHP (php)
Here we are extracting a region of interest that will be located inside the rectangle around the face.
# Extract the region of interest from the image
frame_roi = frame[y:y+h, x:x+w]Code language: PHP (php)
In the first line of the following code, we are resizing our mask image using the adjusted height and width. In that way, we will get a smaller mask image that will match the size of the face area. After that, we will convert the image to grayscale because we need to create a binary image out of it.
# Resizing the image
face_mask_small = cv2.resize(face_mask, (w, h),  interpolation=cv2.INTER_AREA)
# Convert image into grayscale
gray_mask = cv2.cvtColor(face_mask_small, cv2.COLOR_BGR2GRAY)Code language: PHP (php)
Now, we will apply cv2.threshold() function in order to get rid of the background of the image. After that, we created an inverse mask using the function cv2.bitwise_not. And in the last line, we will use cv2.bitwise_and() to extract the face mask region of interest.
ret, mask = cv2.threshold(gray_mask, 244, 255,  cv2.THRESH_BINARY_INV)
				mask_inv = cv2.bitwise_not(mask)
				masked_face = cv2.bitwise_and(face_mask_small, face_mask_small, mask=mask)
Now, we need to apply the cv2.bitwise_and() function once more. Here we will use the inverse mask to get the remaining part of the image. Finally, to get the output we need to apply one more step. We need to add together masked_frame image and masked_face image. And that is it. We can just write the video and break the loop. Let’s see how our output looks.
masked_frame = cv2.bitwise_and(frame_roi,  frame_roi, mask=mask_inv)
				frame[y:y+h, x:x+w] = cv2.add(masked_face,  masked_frame)

		out.write(frame)

	else:
		break

# Close all opened files and save them
cap.release()
out.release()
cv2.destroyAllWindows()Code language: PHP (php)
Output:
For completeness we will repeat a while loop once again.
while True:
ret, frame = cap.read()
if ret:
gray = cv2.cvtColor(frame, cv2.COLOR_BGR2GRAY)
face_rects = face_classifier.detectMultiScale(gray, 1.3, 5)
for (x,y,w,h) in face_rects:
if h > 0 and w > 0:
h, w = int(1.4*h), int(1.2*w)
y += 25
x -= 17
frame_roi = frame[y:y+h, x:x+w]
face_mask_small = cv2.resize(face_mask, (w, h), interpolation=cv2.INTER_AREA)
gray_mask = cv2.cvtColor(face_mask_small, cv2.COLOR_BGR2GRAY)
ret, mask = cv2.threshold(gray_mask, 244, 255, cv2.THRESH_BINARY_INV)
mask_inv = cv2.bitwise_not(mask)
masked_face = cv2.bitwise_and(face_mask_small, face_mask_small, mask=mask)
masked_frame = cv2.bitwise_and(frame_roi, frame_roi, mask=mask_inv)
frame[y:y+h, x:x+w] = cv2.add(masked_face, masked_frame)
out.write(frame)
else:
break
cap.release()
out.release()
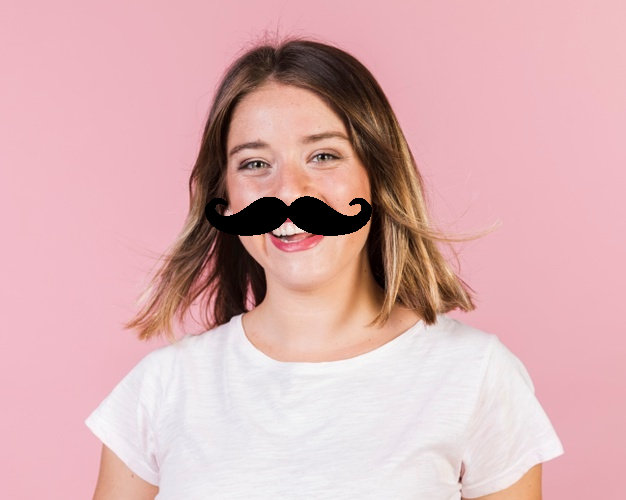
cv2.destroyAllWindows()Code language: PHP (php)2. How to put a mustache over the face?
If you want to have some fun and put the funny mustache over the face you can use a very similar code. The only difference is that instead of a face, we will detect the mouth.
img = cv2.imread("girl1.jpg")

moustaches = cv2.imread('moustaches.jpg')

gray = cv2.cvtColor(img, cv2.COLOR_BGR2GRAY)

smile_rects = smile_classifier.detectMultiScale(gray, 1.8, 20)
for (x,y,w,h) in smile_rects:
  if h > 0 and w > 0:
    h, w = int(2*h), int(1.5*w)
    y -= 40
    x-= 40
# In this example pay attention that we have also adjusted parameters (x,y,h,w)that we got as the output of the face
    img_roi = img[y:y+h, x:x+w]

    moustaches_small = cv2.resize(moustaches, (w, h),  interpolation=cv2.INTER_AREA)
    gray_moust = cv2.cvtColor(moustaches_small, cv2.COLOR_BGR2GRAY)

    ret, mask = cv2.threshold(gray_moust, 20, 255,  cv2.THRESH_BINARY_INV)
    mask_inv = cv2.bitwise_not(mask)
    masked_face = cv2.bitwise_and(moustaches_small, moustaches_small, mask=mask)

    masked_frame = cv2.bitwise_and(img_roi,  img_roi, mask=mask_inv)
    img[y:y+h, x:x+w] = cv2.add(masked_face,  masked_frame)

cv2_imshow(img)Code language: PHP (php)
Output:
3. How to put glasses over the face?
We already know how to detect eyes with Haar cascade classifiers. Let’s now have some fun with that and let’s learn to put on the glasses. For that, we will use similar code, but instead of faces and smiles, we need to detect eyes.
img = cv2.imread("girl2.jpg")

sunglasses = cv2.imread('sunglasses.jpg')

gray = cv2.cvtColor(img, cv2.COLOR_BGR2GRAY)

eye = l_eye_classifier.detectMultiScale(gray, 1.3, 9)
for (x,y,w,h) in eye:
  if h > 0 and w > 0:
    h, w = int(3*h), int(4.5*w)
    y -= 30
    x -= 130

    # Once again pay attention that here(x,y,h,w)is not alaways the face, but in this case this is the postiton of the left eye
    img_roi = img[y:y+h, x:x+w]

    sunglasses_small = cv2.resize(sunglasses, (w, h),  interpolation=cv2.INTER_AREA)
    gray_sunglasses = cv2.cvtColor(sunglasses_small, cv2.COLOR_BGR2GRAY)

    ret, mask = cv2.threshold(gray_sunglasses, 230, 255,  cv2.THRESH_BINARY_INV)
    mask_inv = cv2.bitwise_not(mask)
    masked_face = cv2.bitwise_and(sunglasses_small, sunglasses_small, mask=mask)

    masked_frame = cv2.bitwise_and(img_roi,  img_roi, mask=mask_inv)
    img[y:y+h, x:x+w] = cv2.add(masked_face,  masked_frame)

cv2_imshow(img)Code language: PHP (php)
Summary
In this post, we have learned something useful and also something funny. We have learned how to use Haar cascade classifiers to detect different face parts. We also showed how to put masks, glasses, and mustaches over the face. In the next post, we will talk about feature detection in images.
References:
[1] OpenCV: Computer Vision Projects with Python by Joseph Howse, Prateek Joshi, Michael Beyeler


